Generally speaking, a blog is a website which has frequently updated posts or entries written in a conversational or informal style, similar to an online personal journal or diary, and the posts are listed in feed format. A blog can include posts written by one person alone, or a blog can include posts written by a small group of people.
Content editors at Seattle University can use the Blog Post content item (in conjunction with the Organizer content item) to create a blog on their Seattle U website.
Description
As you can see in the example below, the blog post content type is styled and laid out very simply: With a large heading in red text (the name of the blog post), a short, italicized description of who and when the post was made (i.e. Posted by Megan Otis on May 18, 2017 at 1:05 PM PDT) and then the body of the blog post.
All of the blog posts in that section are then displayed in a long list, but each heading is a link to a separate page, with a different URL, where just that single blog post is shown.
Available in zone(s):
Permissions:
When to use it
If you need a blog or other frequently updated running list of posts, then the blog post content type might a good option for you. But before you dive in to creating a blog on your Seattle U website, ask yourself the following questions:
- How often will you update?
- Web users expect a blog to be updated frequently (a minimum of once a month) and if you don't make frequent blog posts, and showing that your page is active and up-to-date, users may lose confidence and trust in your organization. If you anticipate posting updates less frequently than once a month, then a different content type, such as primary content, might be a better match for your purposes.
- Do you need/want a running feed format for your list of posts?
- Is the simple, loosely structured blog post template useful? Or would a more structured template, such as the News content type, a better fit for your purposes?
How to use it
Navigate to the section where you wish to add the list of blog posts, then click over to the 'Content' tab.
Organizer
Click "Create content" then select an organizer content type in whichever zone you prefer: Zone A, B or C.
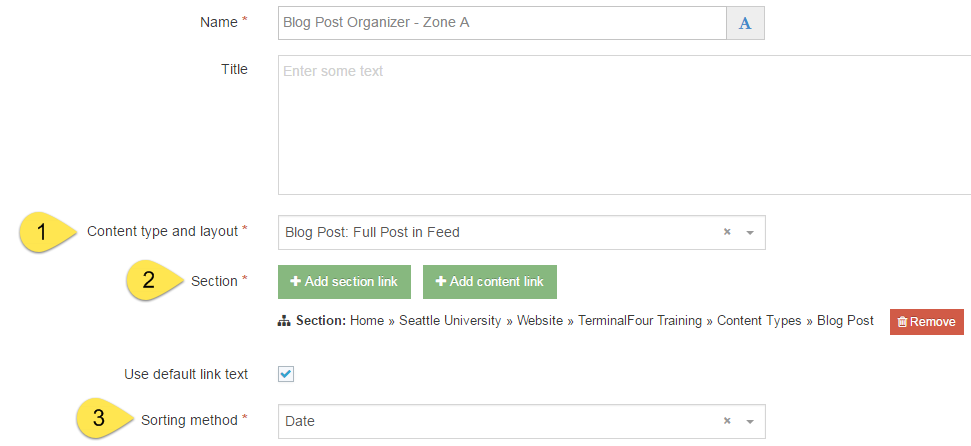
Give the content item a name and then configure the Organizer. At minimum, you will need to:
- Select one of the Blog Post options ("Blog Post: Full post in feed" or "Blog Post: Summary in feed") in the Content Type and Layout field
- Select the section where TerminalFour will find the blog post content items that you wish to be displayed by this organizer
- Select how you would like your posts to be sorted (such as by date, by name, or by their order within the section)

You can also give the Organizer a "title" which will appear as a heading above the feed. Once you have configured your Organizer content item(s), then you can begin creating blog post content items.
Blog Post
Navigate to the section where you would like to store your blog posts, then click "Create content" and select "Blog post."
Pro tip: You may find it helpful and easier to stay organized if you have a separate folder/subsection where you just store your blog post content items, separate from your organizer(s) and the other content items on that page.
Note: If "blog post" does not appear in your list of content, you may not be part of the "Curators" permissions group. Request permission by contacting web@seattleu.edu.

Required fields
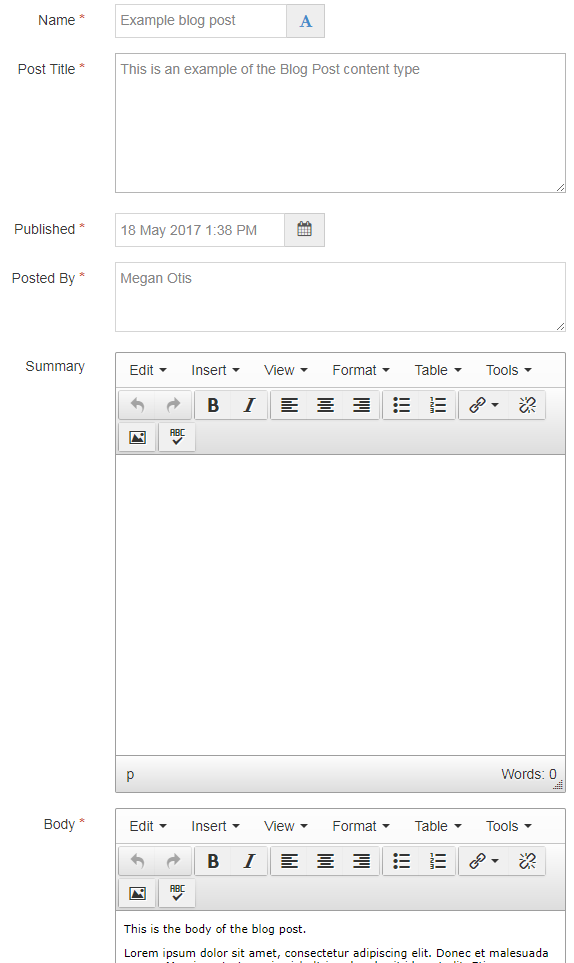
There are five required fields in the Blog Post content type:
- Name
- The text in this field is for internal, informational purposes only, and appears in the list of 'content in this section.'
- Post Title
- The text in this field becomes the large title text for your blog post.
- The title also becomes part of the URL for the page which displays the individual blog post. You'll want to try to keep the title short.

- Published (select date/time)
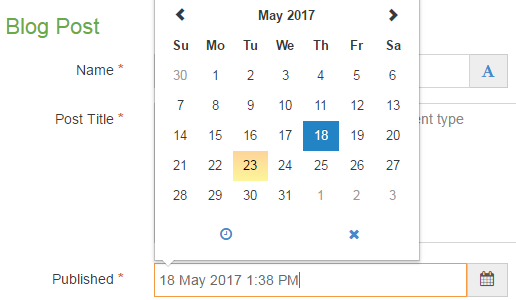
- The date and time in this field become part of the short, italicized description underneath the post title. This date and time should be when the blog post is published to the website. The date in this field is selected by the date picker. The time generated in this field defaults to being the time when you first click into the date field, but you can manually change the time if you wish.
- Posted by
- The text in this field become part of the short, italicized description underneath the post title. This should be the name of the person who authored the blog post, and is displayed under the blog title.
- Body
- The text in this field becomes the body of your blog post. You can add styling to your text (i.e. headings, bold, italics), lists, links, and images to the body of your blog using the Text Editor.
Optional fields
- Summary
- If you choose to have the summary feed (instead of the full post feed) then you will need to include text in the summary field.
- This could be a traditional summary of the blog post, or it could also be an outline, a short teaser, or just the first paragraph of the blog post. Whatever text you put in this field, it's what will show in the summary feed, and should entice your users to click on the link to read the entire post.
Additional things to consider
Recommendations for using the Organizer with your blog
Blog Post content items must be used in conjunction with an Organizer content item, but you have several options as to how and where to use the organizer.
- Organizer in Zone A
- Full entry feed
- Summary feed
- Organizer in Zone B
Your blog section can contain multiple organizer content items - such as one organizer in Zone A for the full entry (or summary) feed, and one organizer in Zone B (for the Latest Entries list).
Examples


