Curated Events
Description
The curated events box content type displays a list of up to nine upcoming events drawn from a specified collection of curated event content items.
Once an event has ended, it will automatically be removed from the curated event box (that way you never have to worry about having information about old, out-of-date events again) and the next soonest upcoming event will be added to replace it.
Curated events require two different content types to work correctly: 1) Curated Events Box, and 2) Curated Event.
Available in zones:
- Zone B
- Zone C
- If you would like a curated events box in Zone A, see the Featured Curated Events content type.
Permissions:
- Users must be added to the "Curators" permissions group in order to use this content type.
How to use it
You need to use both the "Curated Events Box" content type and the "Curated Event" content type to make these content types work.
Curated Events Box
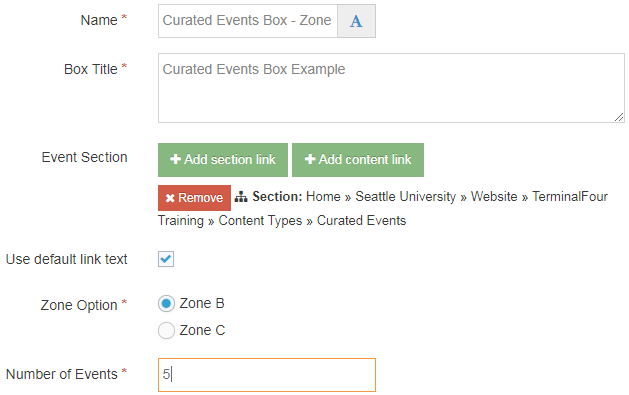
Navigate to the section where you wish to add the curated events box, then click over to the 'Content' tab, click "Create content" and select "Curated events box."
Note: If "curated events box" does not appear in your list of content, you may not be part of the "Curators" permissions group. Request permission by contacting web@seattleu.edu.

Required Fields
- Name
- The text in this field is for internal, informational purposes only, and appears in the list of 'content in this section.'
- Box Title
- The text in this field becomes the title or heading of the curated events box. Something like "Upcoming Events" would work best here.
- Zone Option
- Radio button selection of Zone B or C
- Number of Events
- In this field, specify how many events you would like to be displayed in the curated events box by entering a number 1 through 9.
Optional Fields
- Event section
- In this field, you need to identify the section or folder where TerminalFour will find all of the 'curated event' content items that they will import and display in the curated events box.
Once you have created and configured your curated events box, then you need to create the curated event items that will provide the information for T4 to pull in and display in the curated events box.
Curated Event
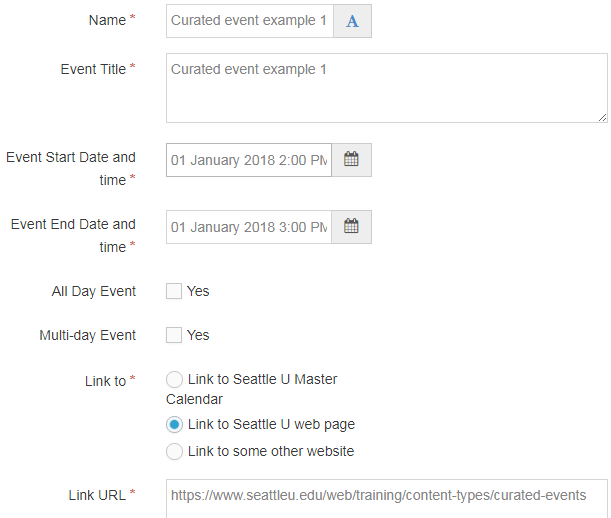
Navigate to the section where you would like to store your curated events, then click "Create content" and select "Curated event."
Pro tip: You may find it helpful and easier to stay organized if you have a separate folder/subsection where you just store your curated event content items, separate from your curated events box and the other content items on that page.
Note: If "curated event" does not appear in your list of content, you may not be part of the "Curators" permissions group. Request permission by contacting web@seattleu.edu.

Required Fields
- Name
- The text in this field is for internal, informational purposes only, and appears in the list of 'content in this section.'
- Event Title
- The text in this field is the name of the event and becomes the link text beneath the event Date and Time.
- Event Start Date and Time
- In this field, you will use a date picker to select a day and time of when the event begins.
- The start date (and also perhaps the time, depending on which of the optional fields are selected, if any) in this field is displayed (in all caps) above the name of the event.
- Event End Date and Time
- In this field, you will use a date picker to select a day and time of when the event ends.
- Additionally, the end date in this field determines when the event will be removed from the box and replaced by the next event.
- Link to
- In this field, you need to select one of three radio button options. Is this link going to a page on the Seattle U Master Calendar? Is this link going to a Seattle U web page? Or is this link going to some other website?
- Link URL
- In this field, copy and paste the URL for the page that users will be linked to when they click on the name of the event. This should be a page where users can find out more information about the event.
Optional Fields
- All day event
- If this is an all-day event, check the box.
- If the all-day event box is checked, then the beginning time and end time will not be displayed, only the date will be displayed.
- Multi-day event
- If this event spans multiple days, then check this box.
- If the multi-day event box is checked, then the end date (and possibly also the end time) will be displayed.
You can see examples of how selecting these options changes how your events are displayed by looking at the curated events example on this page.